如何套用別人的 Jekyll 主題? - GitHub Pages x Jekyll x Blog
本篇重點
- 在本機建構 Minimal Mistakes 主題的靜態網站。
- 介紹怎麼新增文章。
- 介紹如何初步使用 GitHub Desktop。
- 介紹如何將 Minimal Mistakes 主題套用到 GitHub Pages。
💡 在參考以下執行方式前,電腦應該要具備 Ruby, Gem, Jekyll, Bundle 囉!
先在本機將 Minimal Mistakes 建構起來
Gem-based method
- 從該主題的安裝文件中,看到 Gem-based 安裝方法。
- 該方法就是在本機透過
jekyll建構該主題。 - 大致過程跟
jekyll new建構 Jekyll 預設主題差不多。 -
1). Gem-based method 安裝流程(可直接參考安裝文件)
  # 以下都在 Minimal Mistakes 資料夾
  # 1. 將 Gemfile 改成如下
  source "https://rubygems.org"
  gem "minimal-mistakes-jekyll"

  # 2. 執行 bundle 安裝
  bundle

  # 3. 將 _config.yml 中的 theme 欄位修改為
  theme: minimal-mistakes-jekyll

  # 4. 執行!
  bundle exec jekyll serve --livereload --host 0.0.0.0 --trace
💡 如果執行時報錯,可能又是 webrick 在搞鬼,可以仔細看一下錯誤內容。如果是的話,就執行
bundle add webrick,並重複步驟 4。 -
2). 安裝完成後,應該可以在
http://localhsot:4000中看到 Minimal Minstakes 的主題畫面。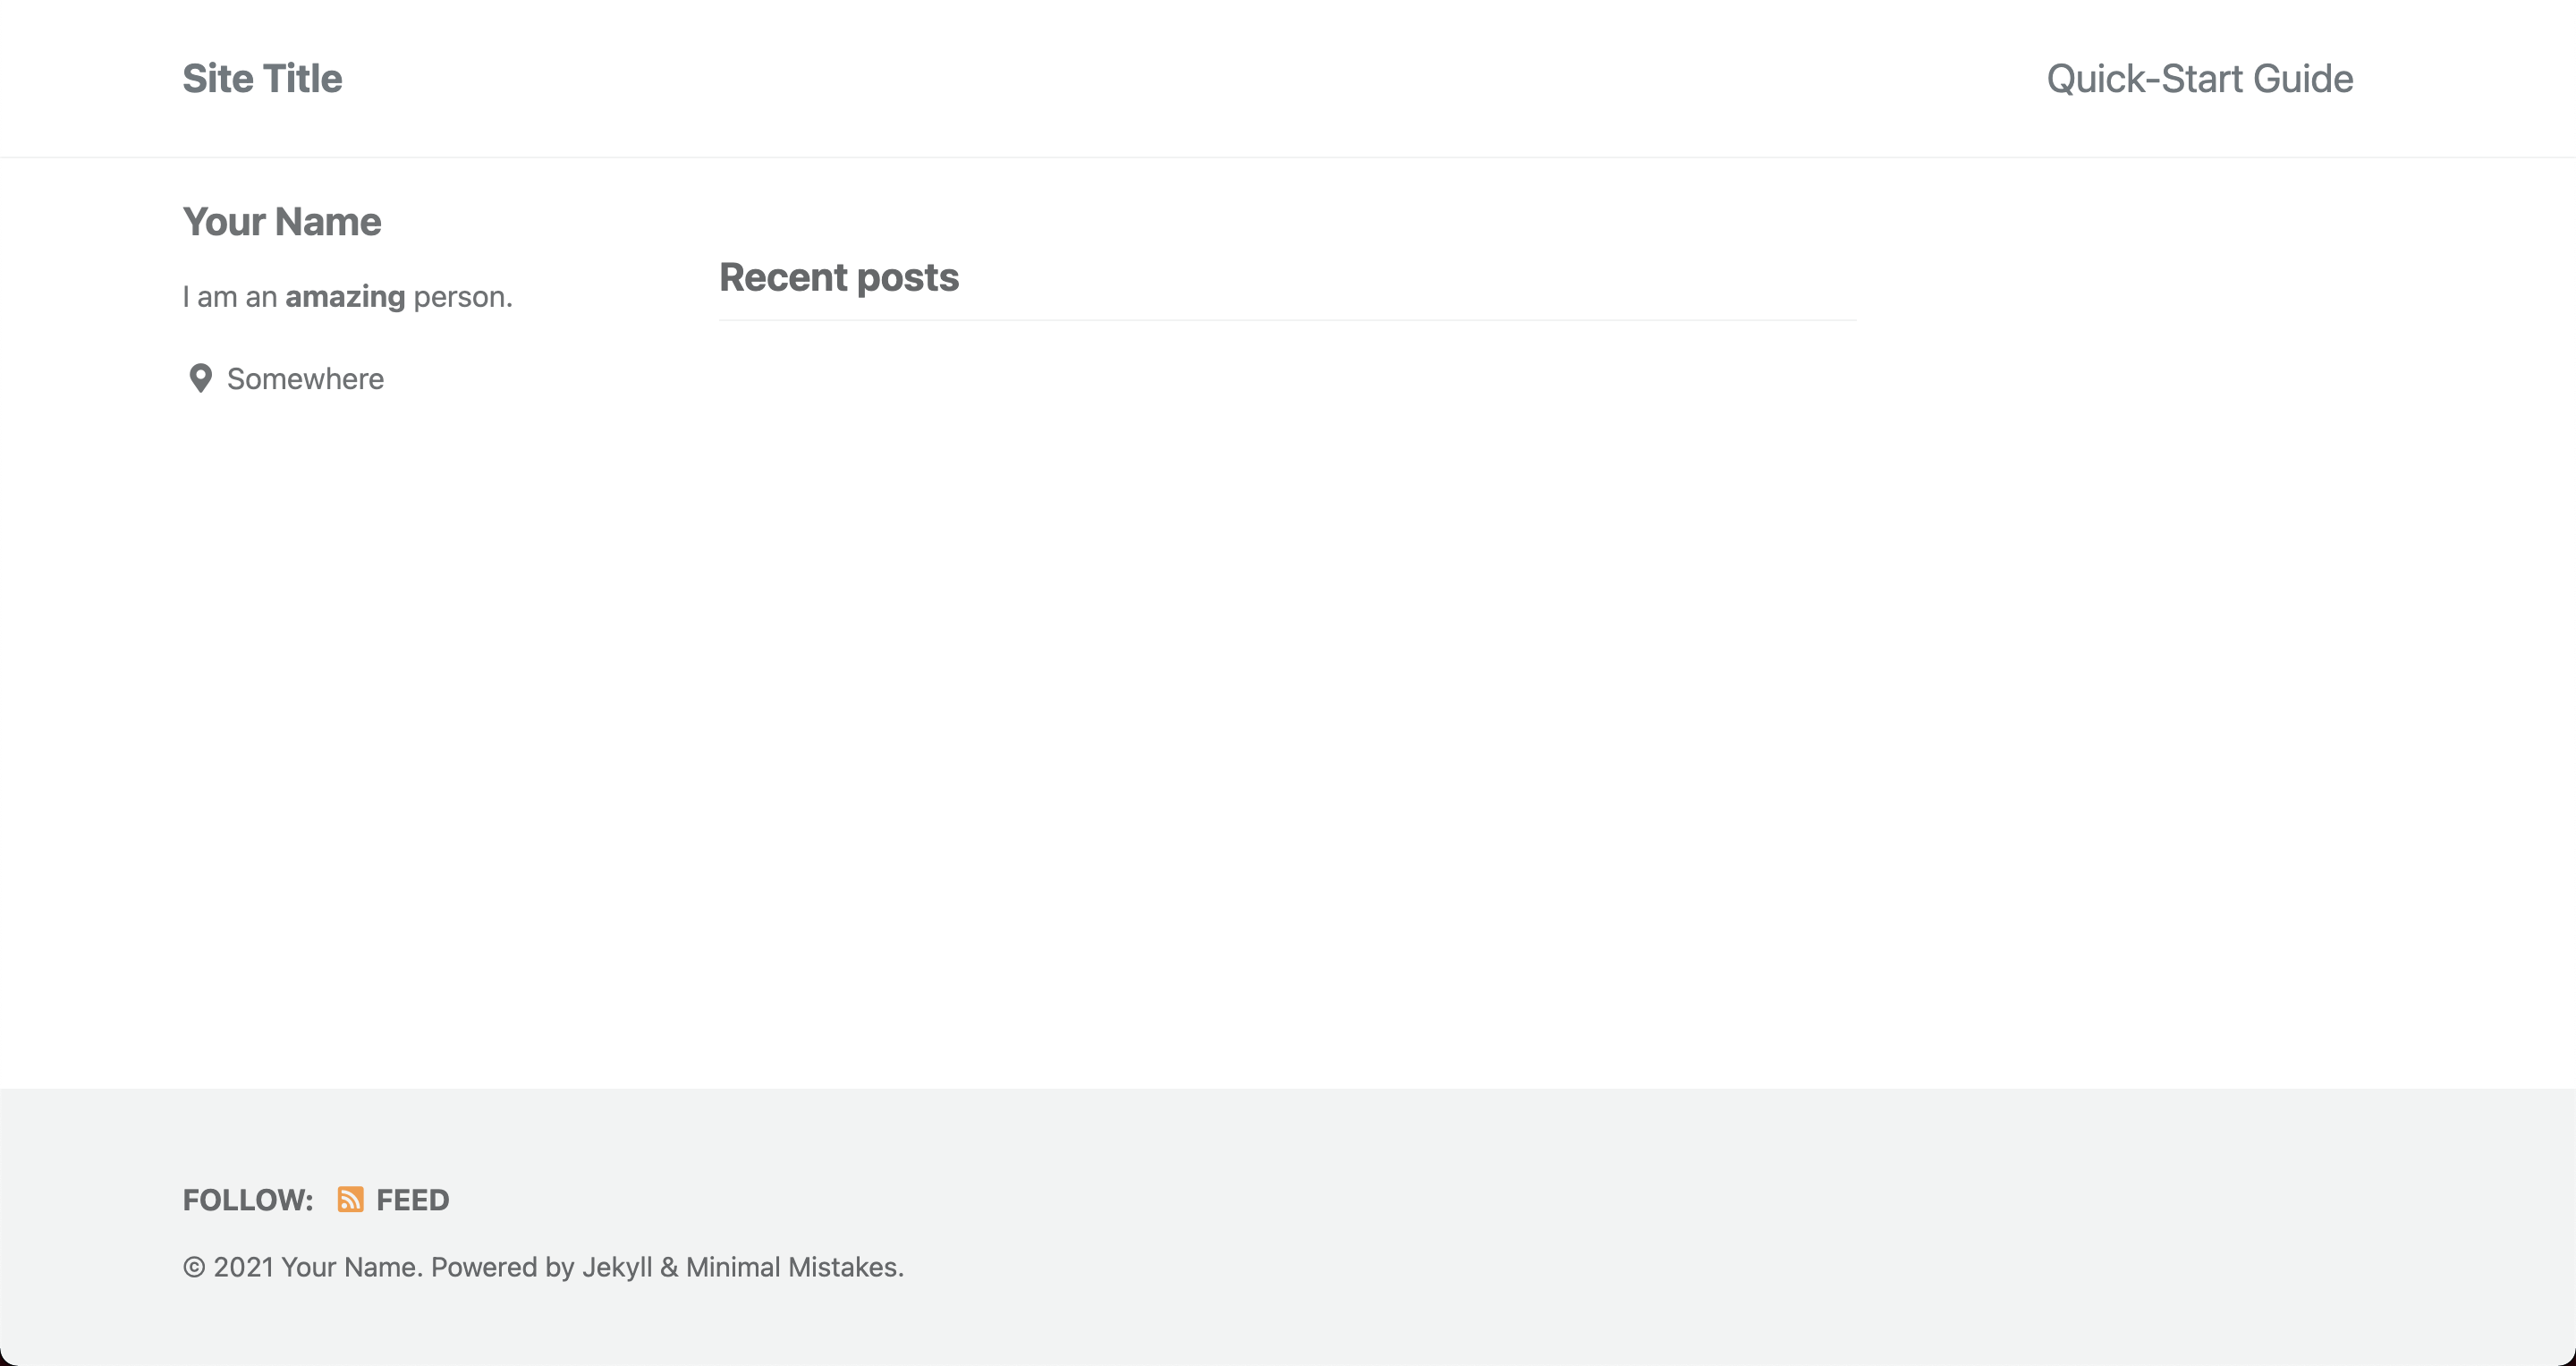
-
3). 現在,可以試著新增一篇文章!
  # 1. 首先,在 Minimal Mistakes 資料夾中新增 _posts 資料夾
  # 2. 在 _posts 資料夾中新增一個檔案,格式採用 YYYY-mm-dd-file_title.md
  #    例如我新增 2021-12-28-test-article.md

  # 這時 Minimal Mistakes 資料夾架構應該如下
  .
  ├── CHANGELOG.md
  ├── Gemfile
  ├── Gemfile.lock
  ├── LICENSE
  ├── README.md
  ├── Rakefile
  ├── _config.yml
  ├── _data
  │   ├── navigation.yml
  │   └── ui-text.yml
  ├── _layouts
  │   ├── archive-taxonomy.html
  │   ├── archive.html
  ***├── _posts
  │   └── 2021-12-28-test-article.md***
  ├── _sass
  │   ├── minimal-mistakes
  |
  ... 下略
# 3. 在剛剛新增的檔案中隨便打一些字,例如我打以下內容 # 上半部用 --- 框著的部分是給 jekyll 識別屬性的,不加也沒關係 --- title: "這是部落格的第一篇文章" date: 2021-12-28 17:00:00 +0800 tags: - blog-test --- # 這是部落格的第一篇文章! #### tag: `blog-test` ## h2標題 ### h3標題 終於利用 `jekyll` 將 Minimal Mistakes 主題建構起來囉! 並且也成功的建立了 `_posts` 資料夾,把這個文章放進去。 `jekyll` 看到 `_posts` 資料夾後,就會把裡面的文件轉換成文章啦! 等等再來試看看把 Minimal Mistakes 整個資料夾 push 到 GitHub 的部落格專案目錄會有什麼效果。 -
4). 新增完文章後,再到瀏覽器看,應該會看到文章出現,以我的為例

- 5). 將整個資料夾 push 到 GitHub 的專案目錄吧(
<username>.github.io),這是會用到 Git GUI 工具- 首先,到 GitHub Desktop 官網安裝 GUI 介面。
-
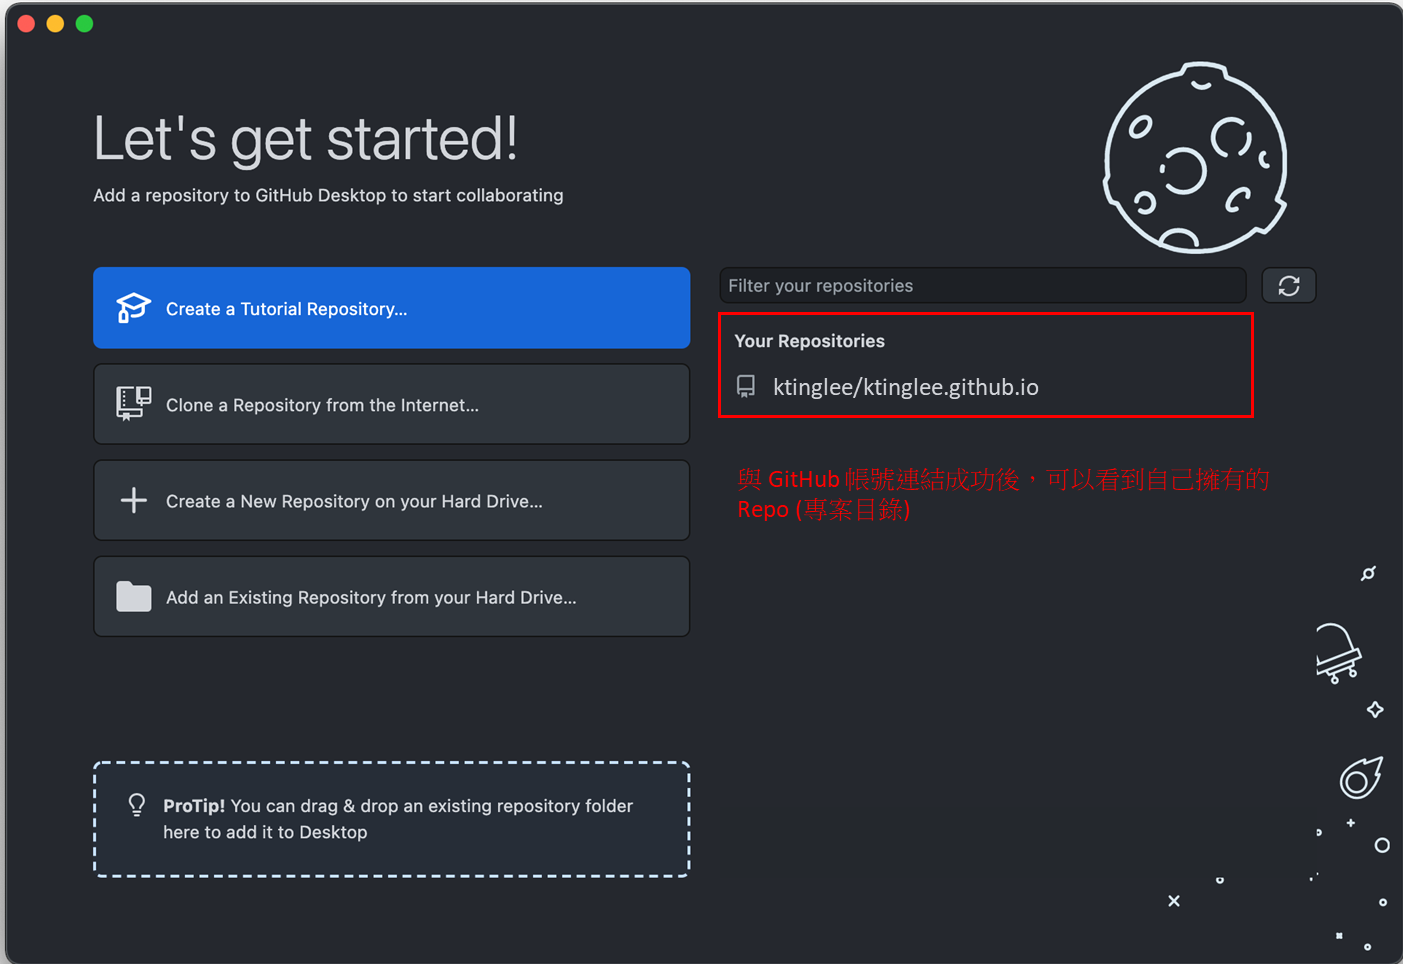
安裝完畢後,在 GitHub Desktop 登入 GitHub 帳號,接著就能看到自己擁有的專案目錄
-
接著點選「clone a Repository from the Internet」,意思是說「將 GitHub 上的專案目錄複製到本機」,這樣就能在本機開發囉!
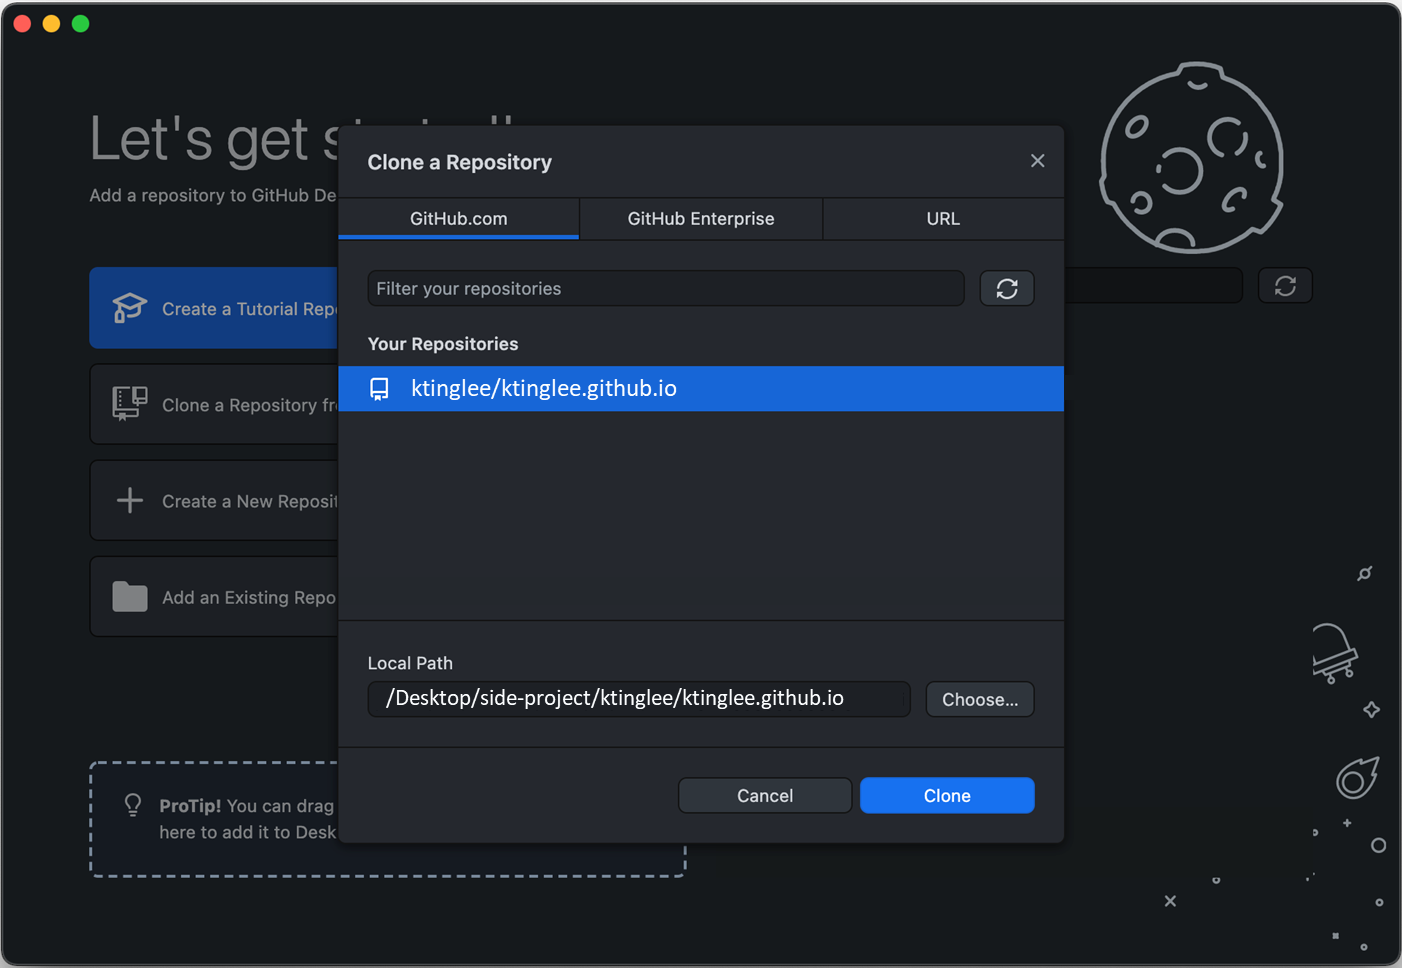
- 開啟複製下來的專案資料夾,例如我是進到
/side-project/ktinglee.github.io,並把所有東西砍光! - 將 Minimal Mistakes 整個資料夾內容複製到專案資料夾中(也包含剛剛新增的文章)
-
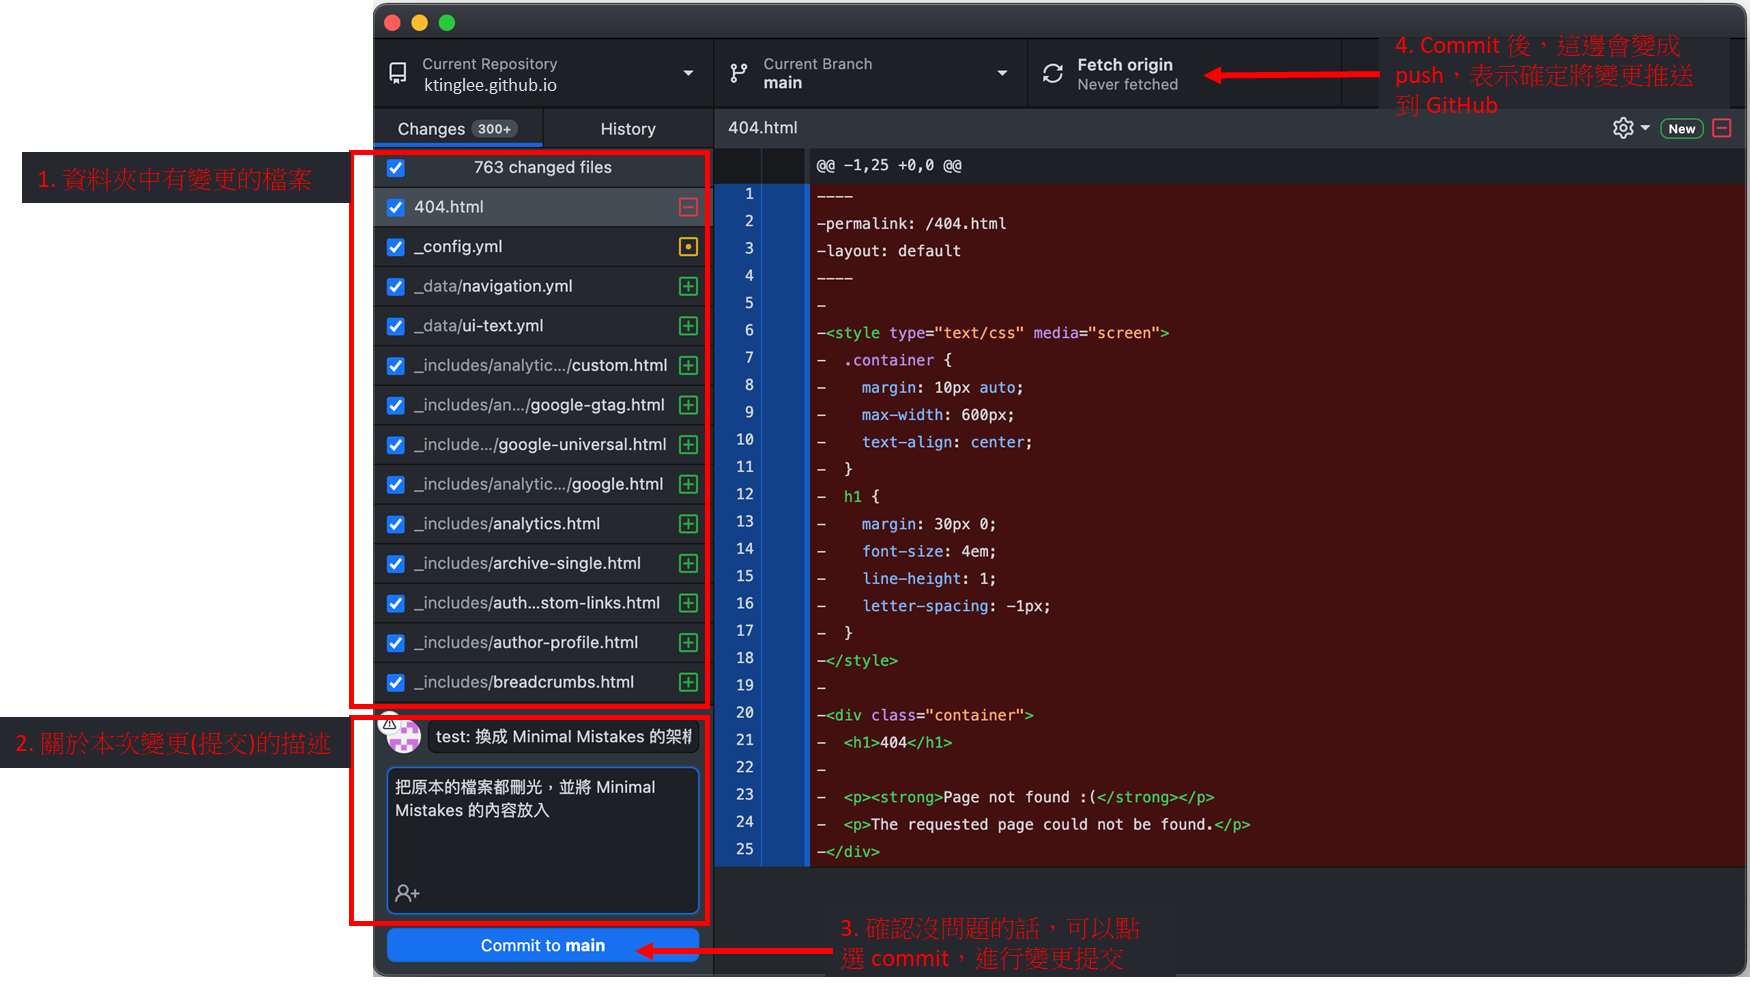
開啟 GitHub Desktop,記得提交內容(commit)後要推送(push)!
-
6). 將 Minimal Mistakes 內容推送到 GitHub 部落格目錄後,會看到「github-pages Failure」。
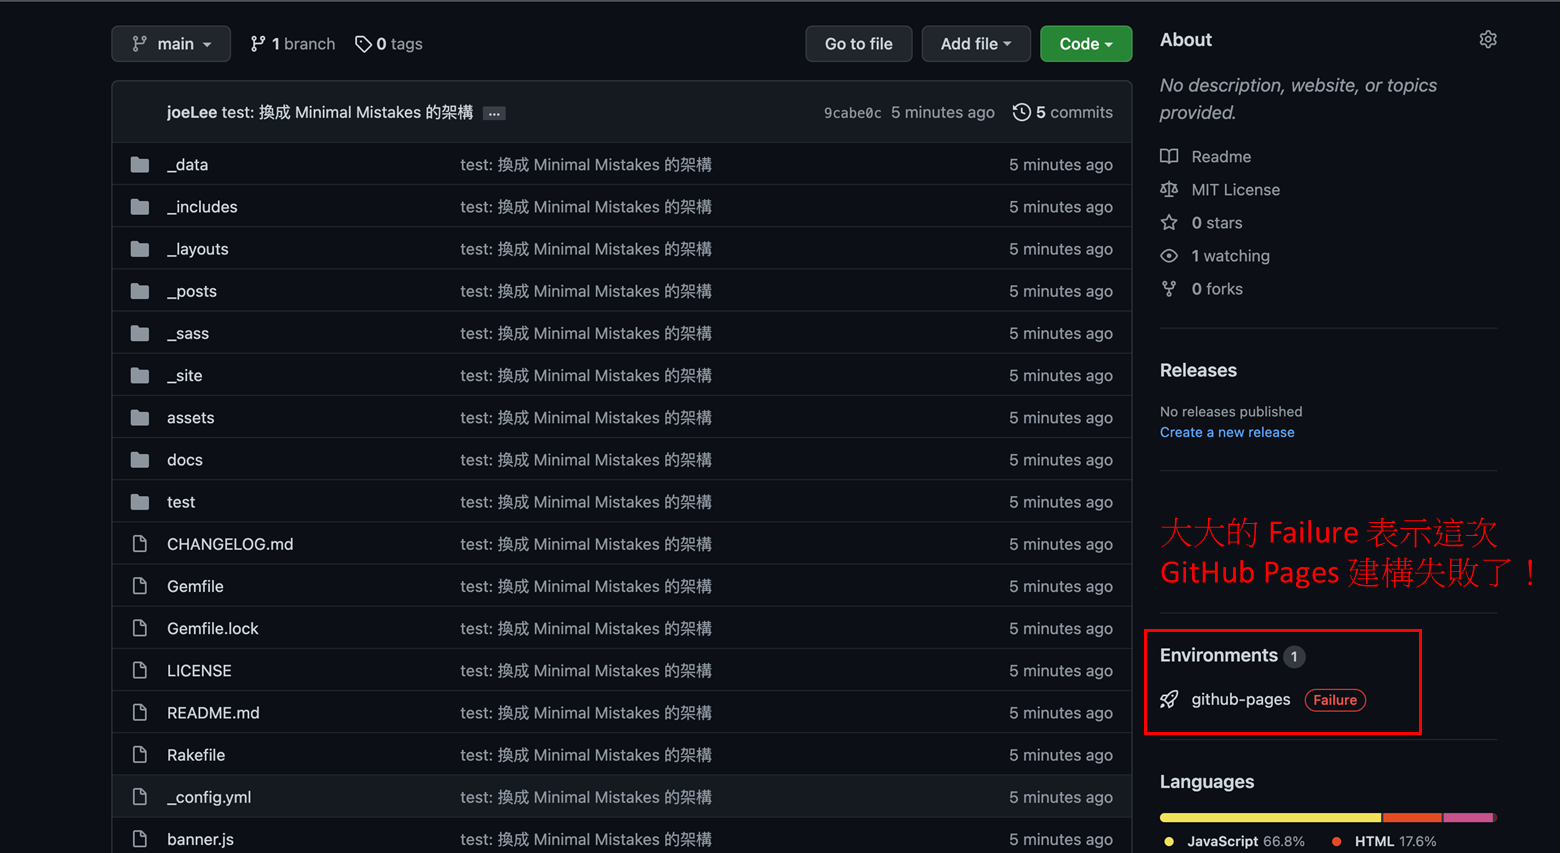
- 部署失敗表示 Minimal Mistakes 的主題內容有問題,所以 GitHub Pages 建構失敗。
- 也因此,即使到
https://<username>.github.io也不會看到新的內容。 - 主要是因為我們部署的是 Gem-based method。
- 如果要讓 GitHub Pages 能順利建構,必須用第二種安裝方式,也就是「Remote theme method」。
Remote theme method
- 可以在本機建構,將建構結果推送到 GitHub 後就能刷新 GitHub Pages 的畫面。
-
1). Remote theme method 安裝流程
  # 現在開始,進到本機的部落格專案目錄
  # 1. 將 Gemfile 內容改成如下
  source "https://rubygems.org"
  gem "github-pages", group: :jekyll_plugins
  gem "jekyll-include-cache", group: :jekyll_plugins

  # 2. 在 _config.yml 中的 plugins 欄位加上 jekyll-include-cache
  # Plugins (previously gems:)
  plugins:
    - jekyll-paginate
    - jekyll-sitemap
    - jekyll-gist
    - jekyll-feed
    **- jekyll-include-cache**

  # 3. 執行 bundle update (如果有 Gemfile.lock 檔案的話,先將其移除再執行 bundle)
  bundle

  # 4. 將 _config.yml 中的 remote_theme 欄位改成 <username>/<username>.github.io
  #    然後將原本的 remote 註解(在開頭加上 #)。以我為例:
  #theme: "minimal-mistakes-jekyll"
  remote_theme: "lktinglee/lktinglee.github.io@main"
💡 之所以
remote_theme結尾要加上@main,是因為 GitHub 預設的 branch 是 main。 - 2). 一樣執行
bundle exec jekyll serve --livereload --host 0.0.0.0 --trace- 照理說能看到與 Gem-based method 一樣的畫面。
-
3). 這時,GitHub Desktop 可能長這樣,說明著更動的檔案有
Gemfile,Gemfile.lock,_config.yml。然後再次將其提交並推送。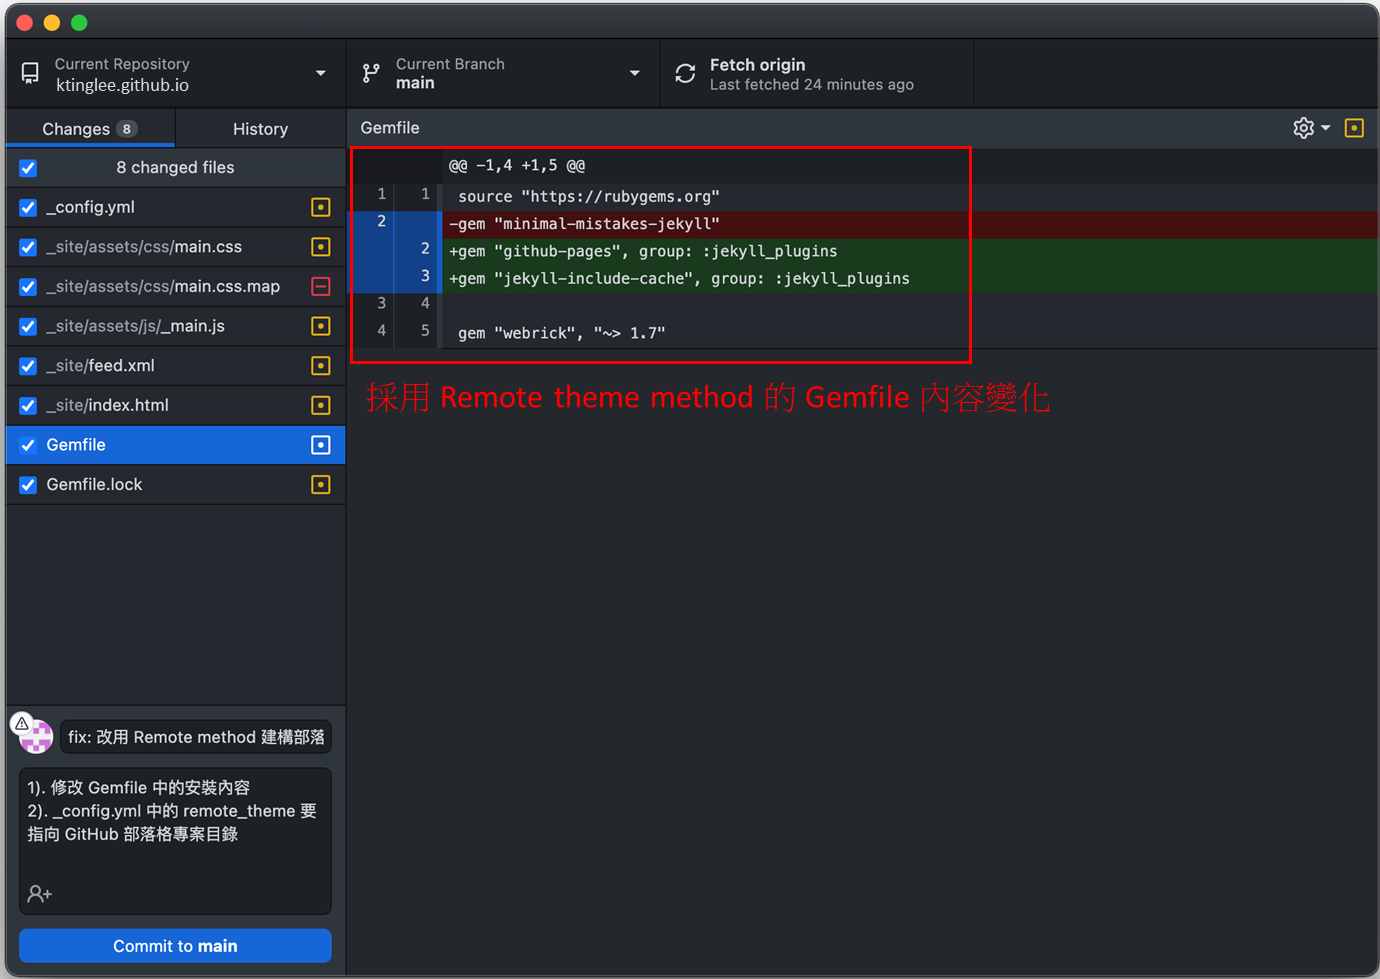
-
4). 接著再次看到
https://<username>.github.io,這次應該就能夠看到新畫面囉!不然也可以進到 GitHub 的部落格專案目錄,檢查 deployment 是否正常。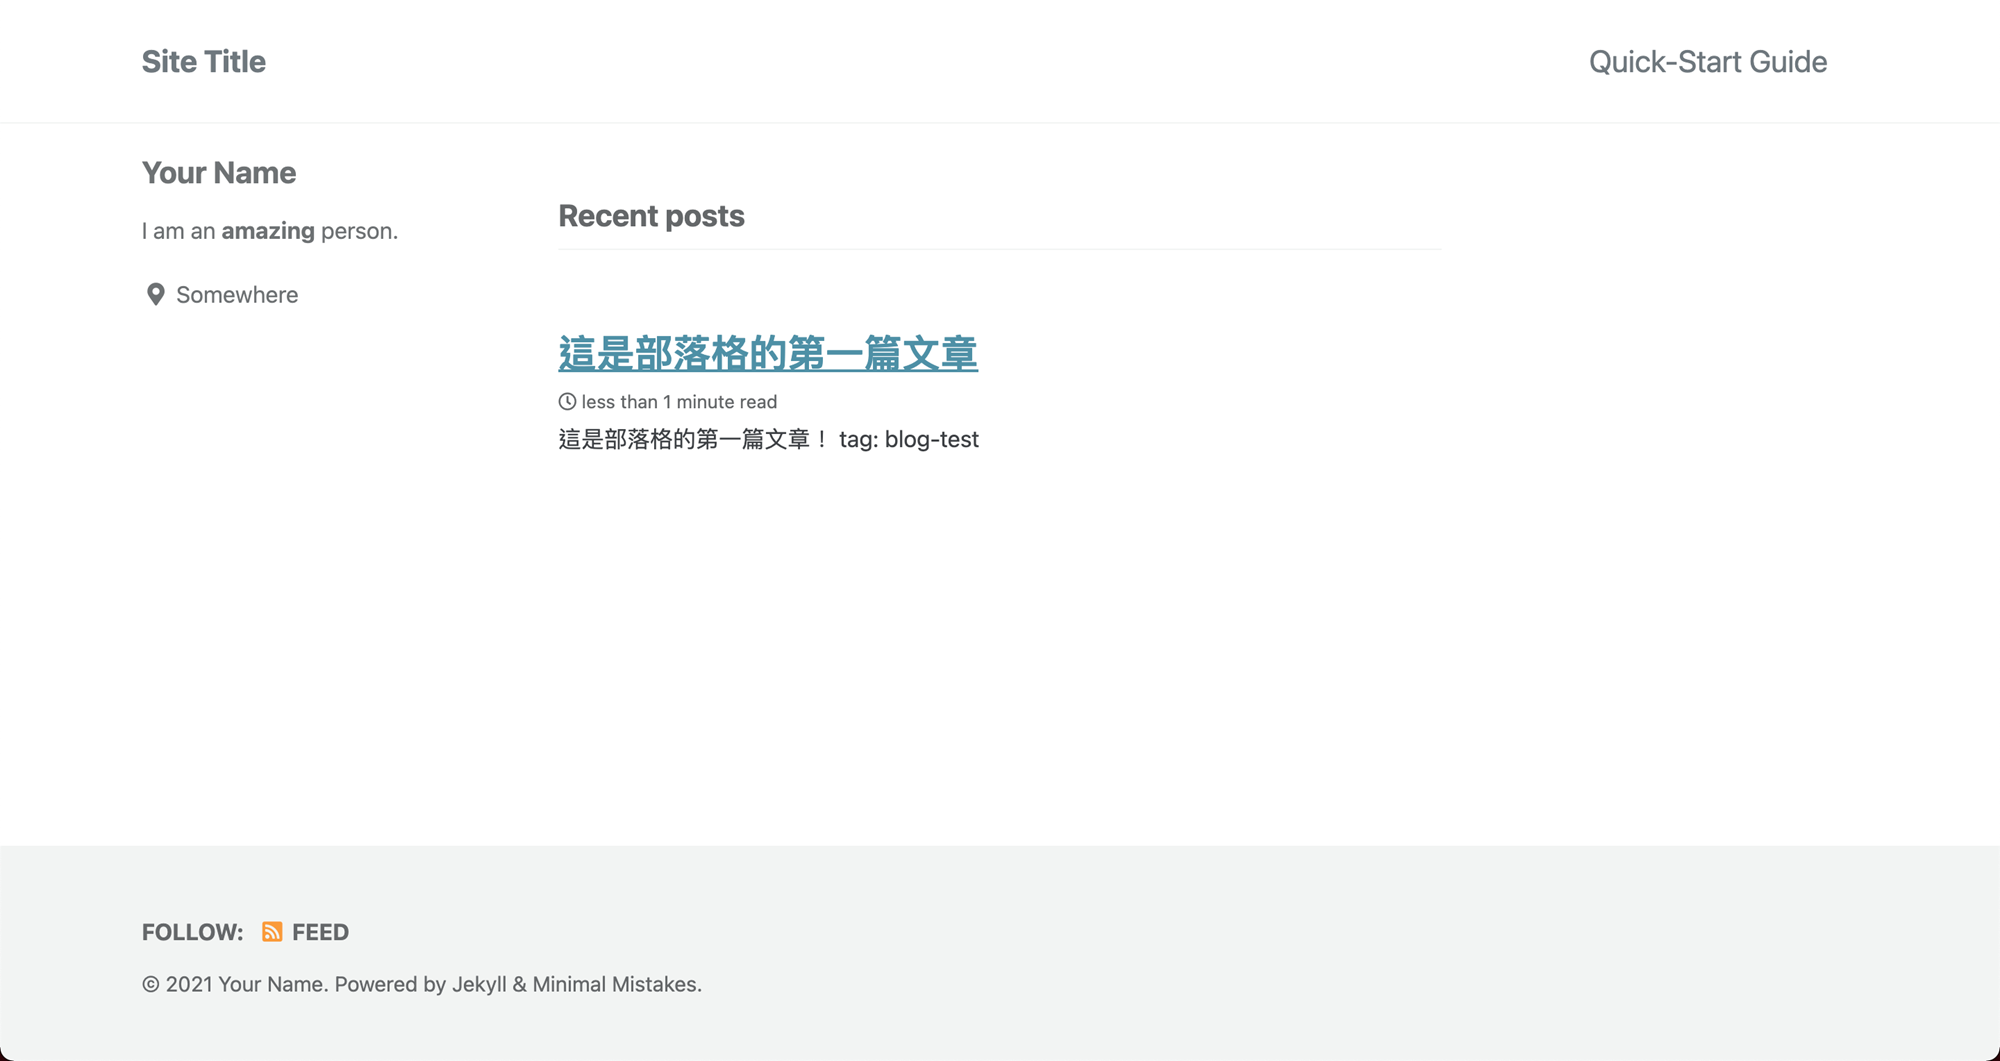
-
執行
bundle exec可能遇到的錯誤(Ruby 版本太高)$ bundle exec jekyll serve --livereload --host 0.0.0.0 --trace # 結果 Configuration file: /usr/src/blog/_config.yml Source: /usr/src/blog Destination: /usr/src/blog/_site Incremental build: disabled. Enable with --incremental Generating... Remote Theme: Using theme ktinglee/ktinglee.github.io Jekyll Feed: Generating feed for posts GitHub Metadata: No GitHub API authentication could be found. Some fields may be missing or have incorrect data. done in 15.259 seconds. bundler: failed to load command: jekyll (/usr/local/bundle/bin/jekyll) /usr/local/bundle/gems/pathutil-0.16.2/lib/pathutil.rb:502:in `read': ***no implicit conversion of Hash into Integer (TypeError)*** from /usr/local/bundle/gems/pathutil-0.16.2/lib/pathutil.rb:502:in `read' from /usr/local/bundle/gems/jekyll-3.9.0/lib/jekyll/utils/platforms.rb:75:in `proc_version'- 上述錯誤經過爬文後,發現可能是版本過高。
- 後來我改用 Ruby2.7 就能解決這個問題。
再發一篇文章!
- 到此,GitHub Pages 已經可以呈現 Minimal Mistakes 的畫面。同時,也有第一篇文章了。
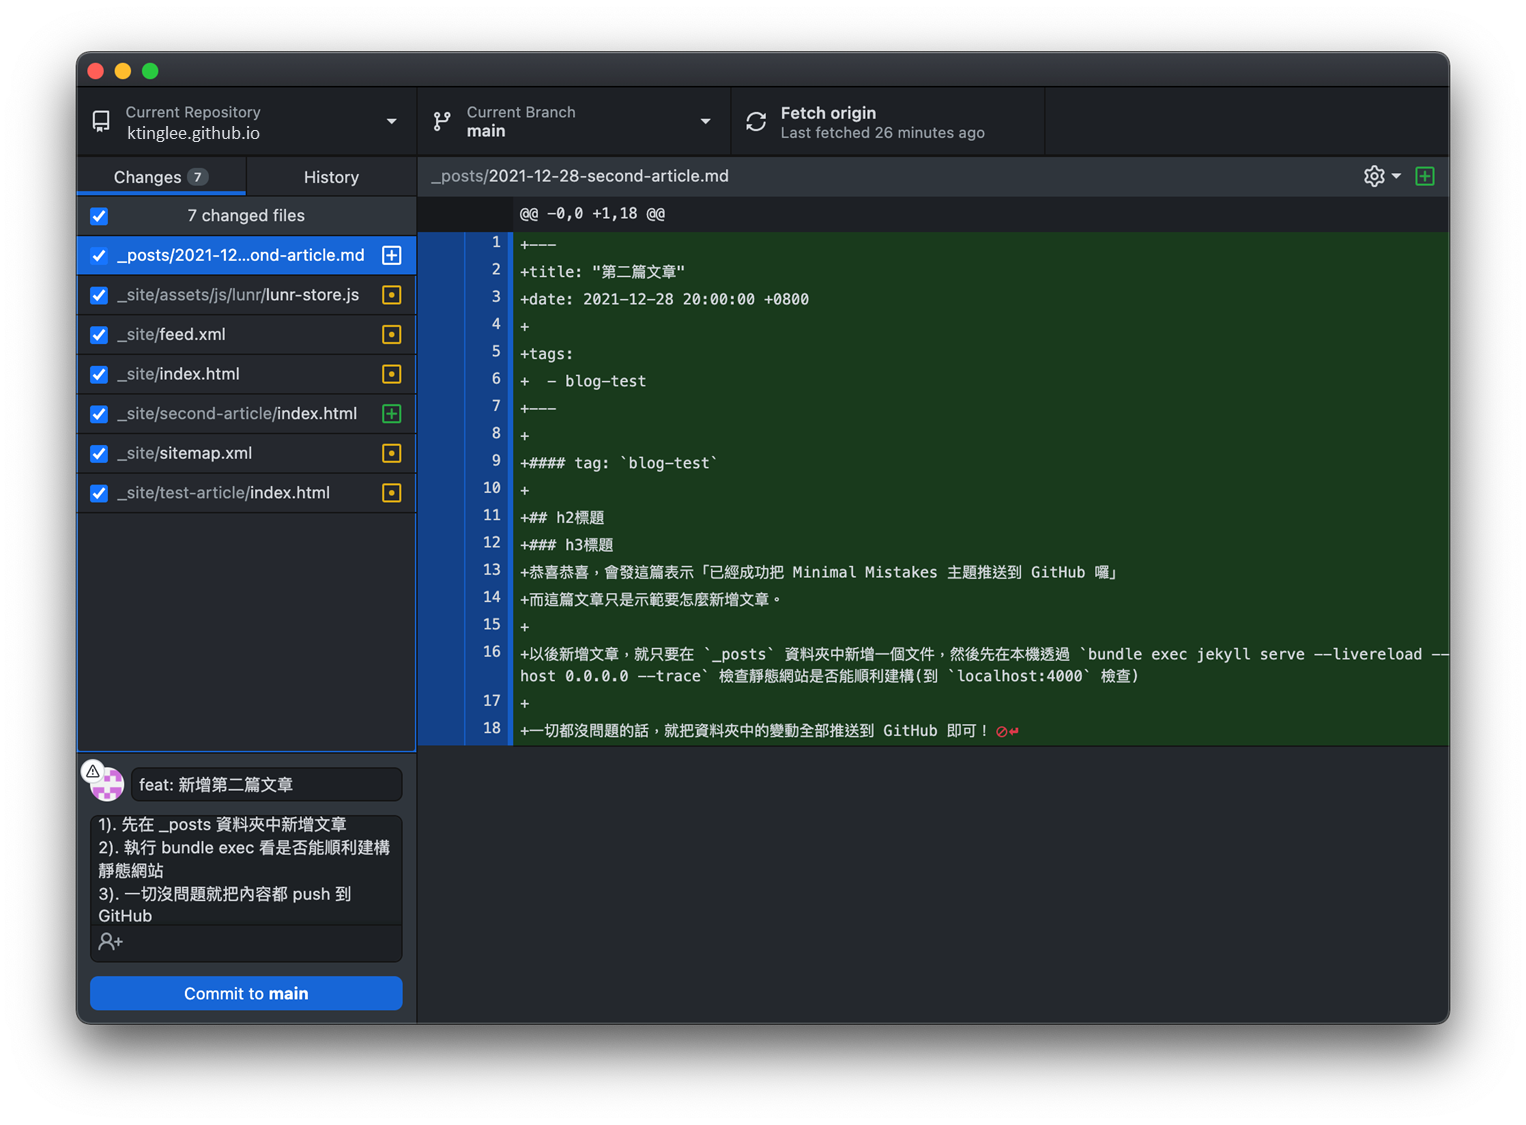
- 後續要新增文章很簡單,只要在「本機的部落格專案目錄(也就是 Gem-based method 的第五步驟 clone 的資料夾)」的
_posts資料夾新增文章,然後推送到 GitHub 上就行了。 - 示範一次
- 例如我從 GitHub 上 clone 下來的資料夾路徑是
/side-project/ktinglee.github.io。- 在該資料夾的
_posts資料夾中新增一篇文章。 - 用
bundle exec jekyll serve --livereload --host 0.0.0.0 --trace檢查是否成功。 - 將資料夾中的更動內容都推送到 GitHub!
- 到
https://<username>.github.io查看是否更新。
- 在該資料夾的
- 例如我從 GitHub 上 clone 下來的資料夾路徑是
結語
- 太棒啦!關於 GitHub Pages 如何套用他人的主題在此告一段落囉!當然,現在畫面就還是很陽春,例如「根本看不出來這是誰的部落格」之類的。
- 之後應該會再寫一些關於 Minimal Mistakes 主題的配置如何調整,例如新增大頭貼、新增個人連結、修改字形等等。
留言